3 Life Drawing Tips from Rob Liberace

I have to admit that I was too distracted by the masterfully rendered life drawings of Rob Liberace to at first pay attention to the medium that he uses to create figures with a reddish tint. The beautiful shapes and interesting poses of the models drew me in, taking me to a specific time and place: the Renaissance.
I was reading through the new eMagazine, Drawing With the Masters, which features life drawing techniques from Liberace, as well as Ted Seth Jacobs and Anthony Ryder. In the article by Austin R. Williams on Liberace, I learned about the artist’s drawing materials: “Red chalk is one of the great approaches to drawing due to its natural beauty and a warm glow that suggests the heat of the human body,” says Liberace. I couldn’t agree more.
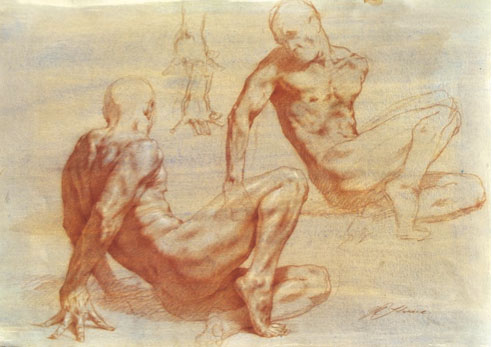
Williams adds, “Today the material is often called sanguine, a fact that highlights the link between the color of the medium and the redness of blood. Natural red chalk is hard to find in art stores, and it can produce very inconsistent lines. However, modern-day equivalents such as Conté or terra cotta pencils still have the warmth of natural red chalk with few of the drawbacks.”
You’ll learn quite a bit in Drawing With the Masters, which you can download for only $3.99. Here’s a preview of drawing tips from Liberace.
3 Life Drawing Tips from Rob Liberace
1. Vary the direction of your strokes and the weight of your line to give a sense of space and atmosphere to your drawing. If your lines move only one way all around the figure, the image will look flat.
2. When shading an area, ease the pressure you’re putting on your drawing instrument when moving toward the light. Then, draw with increasing pressure when your line is moving into an area that faces away from the light.
3. Use a brush to occasionally blend your strokes. This will give your drawing a mix of hard, soft, blended, and clear areas, which provides greater realism. ~R.L.
Yours in art,
Cherie

**Subscribe to the Artists Network newsletter for inspiration, instruction, and ideas, and score a free download on Human Figure Drawing: A Two-Part Guide by Sadie J. Valeri.

Have a technical question?
Contact UsJoin the Conversation!