How to Paint Rose Petals | by Jane Jones

Roll Out the Roses
by Jane Jones
Follow basic shapes and forms to paint petal rolls and leaf flips like a pro.

Petals and leaves exhibit several different forms and movements. A few flip, some ruffle, and others curve in graceful rolls. Some artists think roses are difficult to paint, but if you break them down into individual shapes and forms, the enterprise becomes much easier. Granted, addressing the multitude of small shapes and forms found in these flowers requires some patience, but the exercise is well worth the time and effort when you see your painted roses coming to life.
.

1. Equate petal rolls with cylinders
Rose petals roll, and these rolls are basically small cylinders. For both petal rolls and cylinders, the value transitions have a predictable gradation: The values are lightest where the light is strongest; they darken as they move away from the light, and they’re darkest where the cylinder (or roll) is farthest from the light.
.

2. Study the light, transitions and edges
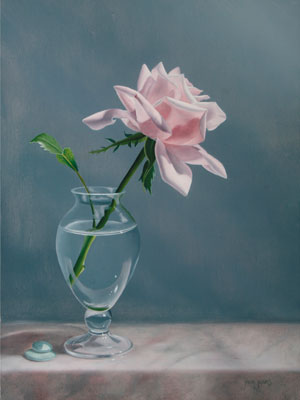
Part of the beauty of any form is the reflected light on the side opposite the lightest area. Always look for this on flowers because each petal reflects onto surrounding petals. For this reason, you can usually see some reflected light on each rose-petal roll. Some of those areas are labeled A in my photograph. Grading your values to show reflected light is a great way to separate petals, especially in the shadow areas.
Also be aware of how quickly or slowly the values transition from light to dark within a given petal. In rose petals, the transitions all occur quickly because the rolls are small. If these were long lily petals, the cylinders would be larger and the transitions more gradual. Consider the quality of the edges between the values: Are they hard or soft? Hard edges (labeled B) usually appear where a shadow is being cast or where two petals touch each other. On the other hand, all of the petal rolls in this photograph, have soft edges (labeled C).
.

3. Lay in the initial colors
I began my painting by putting a thin, very light-valued toning layer of Daniel Smith’s ultramarine red mixed with Liquin (Winsor & Newton) on a gessoed board. I knew this cool, transparent red would show through the background color, relating it to the rose.
I always work from back to front, so next I painted the background and the marble tabletop. All the colors I used in this painting were mixtures of Daniel Smith permanent alizarin crimson and Winsor & Newton viridian and sap green, with titanium white mixed in to create values. I used Liquin as a medium to make the paint move more easily and to hasten the drying time.
I didn’t want the background color to influence the delicate pinks of the flower, so when the background was dry, I painted the rose area with titanium white, adding a bit of Liquin so this undercoat would dry quickly. Once it did, I drew my outline of the rose on the surface.
.

4. Paint each petal
I usually paint a rose from the center out, so I started with the top petals. The first roll (D) has smooth transitions from light to dark with very soft edges, but it doesn’t show reflected light because the petal behind it is quite light. If that petal were dark, then adding some reflected light would be a great way to separate the petal roll from the petal behind it, which is what I did with petal E.
Each roll is a little cylinder (or a variation of one), and each roll needs to be painted with the right values, and those values must have soft transitions between them. Painting these petal rolls is time consuming, but you get a feeling of accomplishment with each one.

5. Flip the leaf
The key to creating a flip in a flower petal or leaf is to follow the edge as it rolls around the flip or turn. On that edge there’s usually at least a little light, which I accentuate. If the light’s not discernible on the actual leaf or petal edge, then I make it discernible on the painting. If the leaf is in shadow, then I create the edge with a darker value, but I always show the edge in some way.
When a petal or leaf flips, usually part of it is in the light and part of it turns away from the light, making detection of the light and dark areas easy. My leaf is almost entirely in the light, but the upper and lower areas are affected differently—the light reflects off the top part and then passes through the lower part, making the lower part brighter than the top. Whatever a leaf’s position relative to the light, the key to depicting the flip is creating an edge that flows from one part of the leaf and connects it to the other.
.

6. Finish marble and vase
To complete Heaven Sent (above), I glazed the back edge and the front drop of the marble with a mixture of alizarin crimson, viridian and sap green. Then I decided that the front of the marble’s top was too dark, so I scumbled a very thin layer of titanium white mixed with a little of the mixture I’d used to paint the marble. I painted the glass vase with the same colors as I’d used for the background (see step 3). For the lightest colors I added a bit of titanium white to the lightest background color.
.
Jane Jones is the author of Classic Still Life Painting (Watson-Guptill, 2004) and a popular workshop teacher. See more of her work and learn about her workshops and DVDs at www.janejonesartist.com.

Free artistsnetwork.tv preview
Click here to watch a free video preview of Beautiful Botanicals With Bente Starcke King.”
MORE RESOURCES FOR ARTISTS
• Watch art workshops on demand at ArtistsNetwork.TV
• Online seminars for fine artists
• Instantly download fine art magazines, books, videos & more
• Sign up for your Artist’s Network email newsletter & receive a FREE ebook


Have a technical question?
Contact UsJoin the Conversation!