To Project or Not to Project – That Is The Question | Drawing for Beginners
I recently concluded a wonderful class about drawing portraits. In the class, there were many newcomers to drawing, and they were eager to learn all of my tricks and techniques. Being accurate is the most important aspect of drawing portraiture. I teach the grid method predominantly in my books, but when teaching a class, I have other tricks as well.
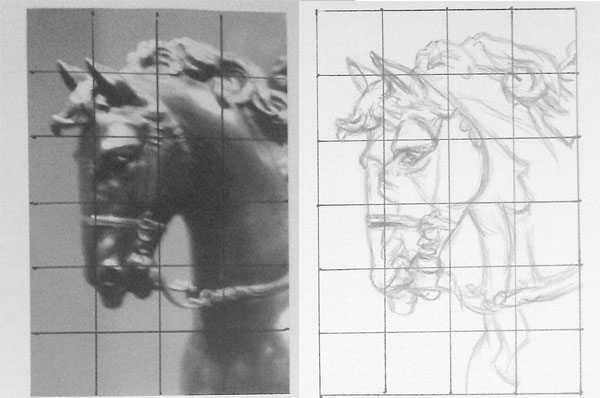
The grid method of dividing a reference photo into small increments, is an excellent way of training your eye to see shapes. It teaches you to see everything as small, interlocking pieces. For me, as an author, the grid method is the best way to teach a student how to create an accurate line drawing, when I can’t physically be there to guide them. It’s highly accurate, but it can be very time consuming.
Preview Lee Hammond’s “Lifelike Drawing” video workshop here!
The grid method has been utilized by artists since ancient times. The Old Masters relied on it for their accuracy and perspective. Back in the olden days, grids were actually used with live subjects and models, since obviously a copy of People magazine wasn’t available to use for practicing drawing portraits. It’s obvious how the grid can be used with a photograph, but how was a grid used for a live model?
I took a class from a school in Minneapolis many years ago, called an Atelier. This is a french word for “workshop,” and it was how the Old Masters taught, where the master artist taught the student, until the student himself became a master. The methods are then carried on that way, intact, throughout the centuries.
It was a fascinating experience and I learned many of the old artistic techniques, one of which was the grid method. To grid something from actual life, they used what was called a plumb line. This was a black piece of cord, weighted down on the end with a fishing weight, hanging perpendicular to the floor. This plumb line was placed on a stick that protruded off the left side of the artist’s easel (if the artist was right-handed). The plumb line was placed so it dissected the subject straight down the middle, breaking it up into equal halves, as the artists viewed the subject. They then drew a vertical line on their paper or canvas, and used the plumb line as a guide. To get the horizontal placement, a long straightedge was placed across the easel, with the long end protruding off to the same side. By looking where the straightedge lined up on the model, and then placing a mark on the canvas, they could see the proportions and draw them in. They would inch the straight edge down, placing marks on the canvas as a guide. By using the plumb line and the straight edge, they would draw in small increments.
Another way that they used the grid method was to create a large wooden frame, and use the black cord, stretched and nailed into place, to create a complete grid of horizontal and vertical lines. This device was on wheels and could be placed in front of an actual subject. The artist placed a hand-drawn grid on the canvas or paper, and adjusted the rolling grid to the size s/he wanted on the paper. The closer the grid to the subject, the bigger it was in the drawing. It’s just like the method I use in my books. As you can see, the units of measure have been used by artists forever.
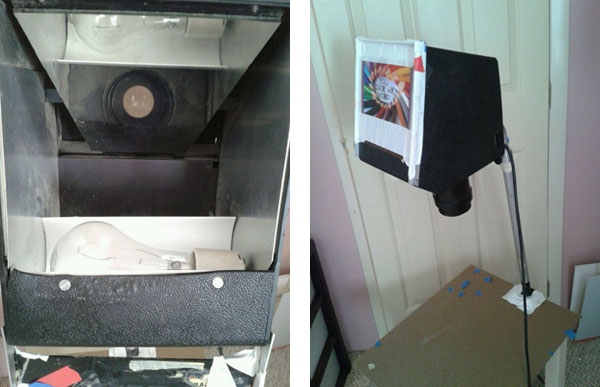
Above, right: While there are many brands of projectors to choose from, my personal favorite is the Kopyrite KR100. I find it to be the most reliable and user friendly. I’ve had mine for over 30 years!
In my classes and personal artwork, I create an accurate line drawing a bit differently to save time. Instead of the tools I’ve mentioned above, I use an opaque projector. This machine consists of a lens, a mirror and a lightbulb. When a photo is placed into the projector, the image shines down onto the paper so the artist can draw the outline. By adjusting the projector, either up or down, the image can be made different sizes, allowing artists to control the size and composition of their drawing.
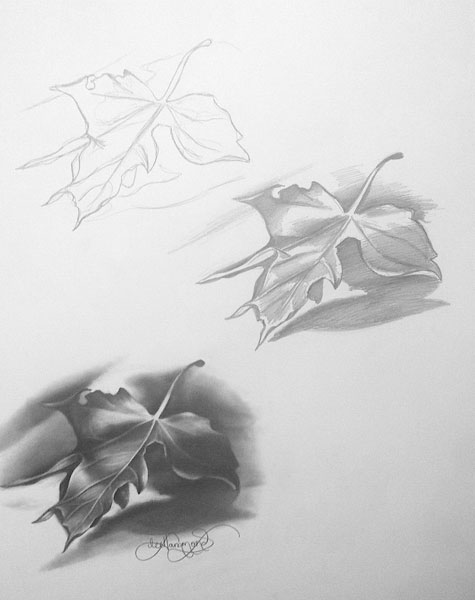
Using a projector is highly controversial in the art community. Many feel that using a projector is cheating, and by using it you are no longer drawing. I couldn’t disagree more. I had given some of my students, who had never used a projector before, a photo to draw using the projector. Offering them no help or advice, they attempted a drawing, thinking that it will look fantastic when they were done. “Anyone can do this,” they may have thought. Wrong! What they came up with was a mishmash of shapes that made no sense at all. What seemed like an easy way to draw, actually complicated everything for them because they outlined too much. Shadows and highlights were drawn as shapes and everything ended up looking like a squiggly jigsaw puzzle of confusing pencil lines.
Norman Rockwell relied heavily on a projector to create his masterpieces. Because of that, some folks in the art field say that he isn’t to be considered a true artist. Again, I disagree wholeheartedly! He was brilliant in the way he used photography and the projector. He was able to manipulate multiple photographs, sometimes using more than 50 photos in one piece. He staged the photos himself, using hand-selected models to create the vision and the story he held in his head. Without the projector, his compositions wouldn’t be nearly as accurate as they were, for he could arrange them and visualize them in the piece before drawing them in.
I also relied on my projector when I was an illustrator for NASCAR®. I had to combine many different photos into one drawing, and it would’ve been extremely difficult to draw all of the small logos without the use of a projector for composition, accuracy and scale.
Research has shown that the Old Masters indeed used forms of projection as well. (You can’t tell me that if a projector had been discovered and sold back in the day, that they would’ve simply said “No, thank you.”) A wonderful book by David Hockney, titled Secret Knowledge: Rediscovering the Lost Techniques of the Old Masters, explains how they did it. It confirms the use of optical tools to gain perspective and realism. It literally debunks the myth that everything back then was done freehand, and shows how foreshortening was improved through the use of projections.
You still have to know how to draw to use a projector well. Without some skill in drawing, your drawing will not be accurate or make sense. I’ve found that using the projector actually helps train your eye and makes your freehand drawing much better over time. Like anything else, it just takes practice.
You have to decide as an artist whether a method or tool is right for you. If you can’t get over the feeling that it’s cheating, then I wouldn’t recommend using the projector. It’s totally up to you. Artists reflect their personality and personal feelings through their art, so you must be honest with your methods, and do what feels right for you. For me, the projector is my best friend. Judge me if you want, but I stand by my choice, and am very pleased with the results that I achieve.
~Lee
Lee Hammond has been called the Queen of Drawing. That may not be fair these days, since in addition to providing the best drawing lessons, she has also created fantastic books and videos filled with the same easy to follow acrylic painting techniques, colored pencil techniques and more. Click here to see all of the instructional books and DVDs that Lee Hammond has to offer!
• Free download! Easy Acrylic Painting Techniques by Lee Hammond


Would we consider an accountant using a calculaor or computer to be “cheating” or a doctor using an x-ray machine to be cutting corners? When we are selling artists who depend on sales, producing great art as quickly as possible means we get paid more per hour. Use a projector and don’t ever accept anyone else’s misguided opinions about your process or craft.
There is a third technic using a grid made on a computer (or tablet)
I made a free application web for this purpose that does your grid without calculations in a few minutes and takes into account the size of your canvas … and it’s free. Here is the video https://youtu.be/NjhlwfXTJ_Y
I was tired of calculation and now I only concentrate on drawing.
Enjoy
I spent 30 years employed and self employed as a sign painter. In that business it was necessary to use an overhead projector to layout hand painted signs of various sizes up to 20 ft. by 10 ft.. This was all part of the production process in order to make money. Today, for my watercolours I’ve been using my eye to get the drawing correct before I paint. For me water colouring is an extension of drawing. I am aware there are exercises to train the eye but I don’t hear a lot about that in art circles. I still have my opaque handy but my artist friend who is a college graduate is completely dependent on his overhead for everything he paints. The results are slick and lacking personality. With hand drawing and painting, the artist has the ability to analyze the surface and not just the pencilled edges. The drawing tool adds meaningful accents or character importance that one may overlook when projecting. Creating a sensitivity to the model when drawing adds subtleness to the finished work rather than ending up with a commercial copy. If I am commissioned to do someone’s portrait, in order to sell, the painting would have to be more than a photographic representation; Otherwise what would be the point of it anyway? Shortcuts may save time and money but you miss the journey.