Basic Drawing Techniques: Draw a Compelling Still Life in 5 Steps

Master basic drawing techniques and tips for drawing in charcoal, and you can render an eye-catching still life drawing step-by-step.
By Steven Levin
Start with an Idea
Arranging a still life is largely a matter of experimentation and observation, but the first step is to decide on a concept. I often like to stick with a single, somewhat narrowly defined concept in a still life — rather than a multitude of different objects — as this gives immediate coherence and unity to the design.
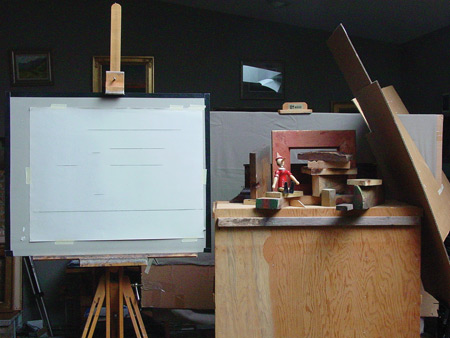
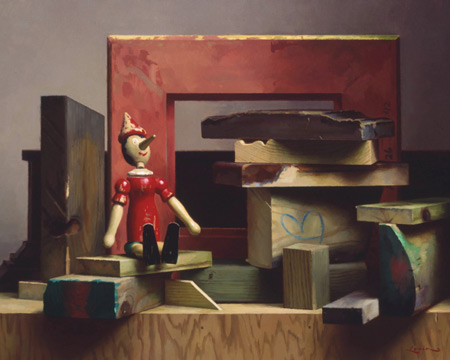
For the step-by-step still life drawing chronicled in this article, I settled on a very simple concept: an arrangement of different pieces of wood in varying colors and shapes. The challenge was to find a way to make it interesting. With a trial-and-error approach, I move objects around, discovering interesting relationships and effects and thereby slowly enhance and refine the composition.
The Drawing
After I have my still life setup finalized, I begin the drawing. At this point, keeping in mind that a few simple ideas will go a long way toward a satisfying result, I reduce objects to simple forms and shapes. Because nature is complex, I begin with basic shapes and tones and slowly refine them as I go. Trying not to get ahead of myself, I work to make each step what it should be. I don’t let myself get too eager to make the drawing look three-dimensional — I have to trust that the subsequent steps will get me there.
Because nature is complex, I begin with basic shapes and tones and slowly refine them as I go. Trying not to get ahead of myself, I work to make each step what it should be. I don’t let myself get too eager to make the drawing look three-dimensional — I have to trust that the subsequent steps will get me there.
1. Take Measurements
First I placed the drawing board directly alongside the still life and set a vantage point roughly 8 to 10 feet away from the setup. Using the vine charcoal and a string or ruler, I took some basic measurements: top of the frame, top and bottom of the Pinocchio doll, and so on. Walking back and forth from my vantage point to the drawing, I made these indications on my paper.

2. Block In Forms
Once I had some basic measurements, I began blocking in all the basic forms of the design, checking them with a ruler or string from my vantage point and erasing with the chamois rag when needed. Then I refined the lines as I kept moving fairly quickly around the drawing, progressing to the same level in each area.
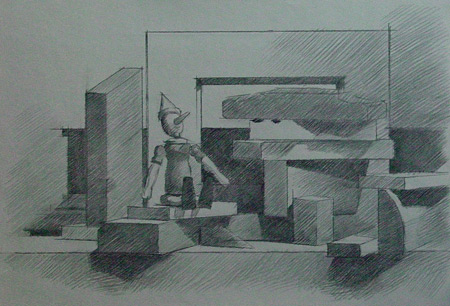
3. Delineate Shadow Edges; Lay In Tone
Here I blocked in the main shadows and began putting in some basic tone with lines at roughly a 45-degree angle. Also, I began to lay in some dark halftones.
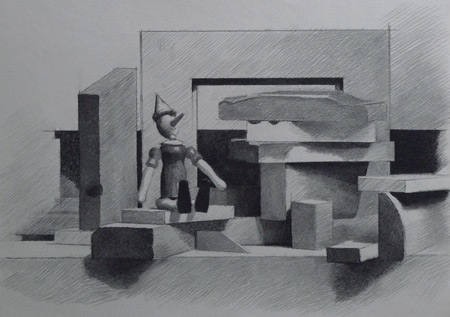
4. Model the Form
This step always takes me by far the longest — modeling the form, creating smooth transitions and even tones. At this point I began using General Pencil’s charcoal pencil to get the deepest blacks. The tone started out very black, but I gradually lightened it with repeated application of the kneaded eraser.
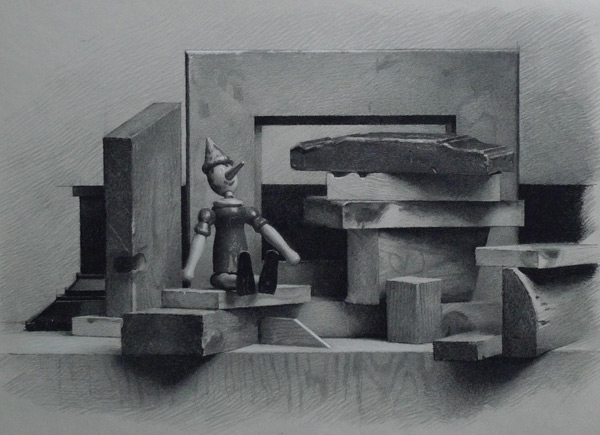
5. Refine and Add Detail
I usually concentrate on one small area at a time and model it to its finish, refining tones and adding incidental detail while taking care to compare values, one to another, to judge their relative tones. Adding the wood grain and other incidental details definitely contributes to the finished look of the drawing. I used the vine charcoal for light halftones, charcoal pencil for darks, and quite a bit of kneaded eraser to work the charcoal in. Finally, with a few touches of the white chalk in just the very brightest areas, I completed the drawing.
Charcoal: 3 Ways to Master the Medium
- Remember to use a sanding block to keep the charcoal sharp! A dull point takes as much charcoal off the page as it puts on; it acts as an eraser.
- Charcoal can be a beautiful medium, but it takes time to achieve a real solidity of form by working the charcoal evenly into the fibers of the paper. Remember, the flatter the tones and the smoother the transitions, the greater the illusion of form. I usually roll the charcoal in my fingers to a point, rub out a bit of charcoal, then roll a new point and repeat. It takes a bit of effort and time to get an even tone, but it’s worth it.
- Be sure to hold off on the incidental details. Suggesting the grain of the wood, for instance, is something that should be done later in the drawing. Getting the proper value relationships and achieving good flat tones will go much further toward producing an effect of three-dimensionality.
About the Artist
Steven J. Levin paints both figurative art and still life, producing work for a one-man show each year. He trained for five years at the Atelier Le Sueur in Excelsior, Minnesota, and continued there seven more years as an instructor. Learn more on his website: stevenjlevin.com.


Have a technical question?
Contact UsJoin the Conversation!