The Sight-Size Drawing Method
Sight-size refers to a method in which the artist makes a drawing the same height as the subject being rendered, as it would appear on either the left or right of the drawing board. From a determined view spot, this allows the artist to see his subject and drawing side by side with both appearing the same size. In this manner the artist is able to make very objective comparisons of shape and proportions. It’s a great learning tool because it helps the student to see objectively how what he or she has drawn compares directly to nature.
Materials
Pencil: A soft pencil (2B) works best for beginning a drawing, as it’s easier to erase. Make sure you keep it a sharp. When drawing, hold the pencil as you would a brush.
Kneaded rubber and white erasers: When erasing, roll the kneaded rubber over the drawing surface. Try not to “scrub” it.
Mirror and black mirror, butterflies: The mirror is used as a measuring tool. Because you are making the drawing the same size as you see it, you can take the reflected image of the model (in reverse, of course) from your view spot and compare that directly to your drawing—thus, the “butterfly” image. The black mirror is simply a piece of black reflective glass. It works the same as squinting. It compresses the values, and helps you better to recognize value relationships and patterns.
Plumb line: Use this to establish a centerline and true vertical. A number of plumb lines are drawn and used throughout the construction of the drawing. By finding a true vertical using a weighted line, the artist is able to establish a series of relationships between form and features and how they compare to one another along that vertical line (i.e., when drawing the figure, it’s always a good idea to see how the ankle of the model lines up with the pit of the neck along a vertical line and where the navel is located in relation to this). Using a plumb line is a great way for understanding and controlling gesture.
1. Setting Up
Make sure the easel is plumb (true vertical) to the ground, and that it’s perpendicular to your line of vision. The drawing paper should be flat and taped to the edge of board, and the board should be flush with the edge of the easel.
Stand far enough back so that model fills the page. The general rule is to stand back three times the greatest width of your drawing surface. Place your standing point between model and easel; you should be able to take in both drawing and model in one glance, without having to move your head from side to side. Mark this view spot with tape, and also mark the bottom of easel.
2. Establish Horizontal Measurements
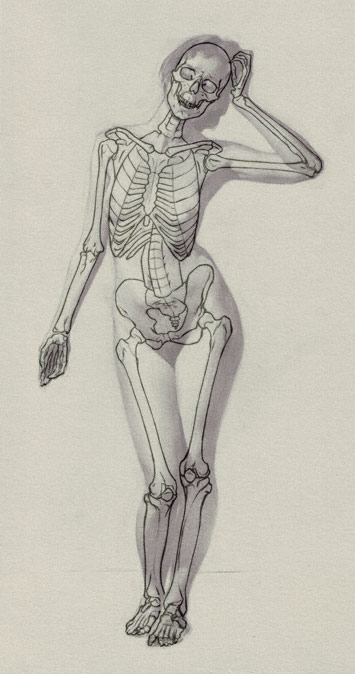
Mark the top of the head, the bottom of the feet and middle of the body (root of the groin, belly button, etc.). Any part of the body—usually the pit of the neck or the edge of the neck in relation to the back of the heel—reinforces the gesture of the figure.
Be attentive to your body as you draw; no slouching. When using a plumb line, lock elbows and keep arms straight. This position can also be used to find widths.
3. Begin Drawing
Using the plumb line and\or mirror, establish basic proportions by marking top of head, the center of the body (belly button, root of the groin, etc.), marking bottom of feet.
Find a few (angular) landmarks on the model, then begin to draw, always checking and rechecking the angles of the lines made. Use long angular lines, keeping them light and sharp. No “scratching” or round, “fuzzy” lines.
See the overall shape or silhouette of the figure and begin to construct the outline (also known as the contour or “holding” line) of the model. Look for big proportions, major references and inclinations.
Establish the shadow line and/or shapes and relate them to the contour line. Look for opportunities to connect the shadow shapes. At this point, don’t include details. See the figure as a whole and forget the features. Squint and simplify.
Note: The shadow line is the edge on the form that separates light from shadow. In antiquity it was referred to as the Apelle’s Line. Apelle was a renowned painter of ancient Greece (Pliny the Elder, rated him first above all other artists and dated Apelle to the 112th Olympiad (332-329 BC), possibly because he had produced a portrait of Alexander the Great). None of his paintings survive today, but it’s noted that Botticelli based his painting The Birth of Venus on Apelle’s work.
4. Taking the Drawing Further
Continue to refine and adjust outline and shadow line (the drawing will become more organic). Look for soft and hard edges along the shadow line. Introduce anatomy simply. Any indication of form should always contribute to the whole. Always think in terms of the overall plane. Hold off from introducing value as long as possible, but introduce a simple, flat tone to separate light from the shadow and to refine drawing and proportions.
More Lessons from Andrew Ameral
To read how Ameral measures proportions of the human body, click here.
Classically trained at the Florence Academy of Art, Andrew Ameral later was director of anatomy there, teaching écorché, painting and drawing. “To appreciate what one sees in the physical world,” he says, “and to be able to interpret that information clearly and efficiently require the deepest humility. Good painting is having the courage to make big drawing corrections.” Ameral currently is an instructor in the fine arts master’s degree program at the Academy of Art University in San Francisco. He also teaches at a private studio there. Visit his website, ameralart.com.
MORE RESOURCES FOR ARTISTS
• Watch art workshops on demand at ArtistsNetwork.TV
• Online seminars for fine artists
• Instantly download fine art magazines, books, videos & more
• Sign up for your Artist’s Network email newsletter & receive a FREE ebook

Have a technical question?
Contact UsJoin the Conversation!