Studio Saturdays: Mixed-Media Planner
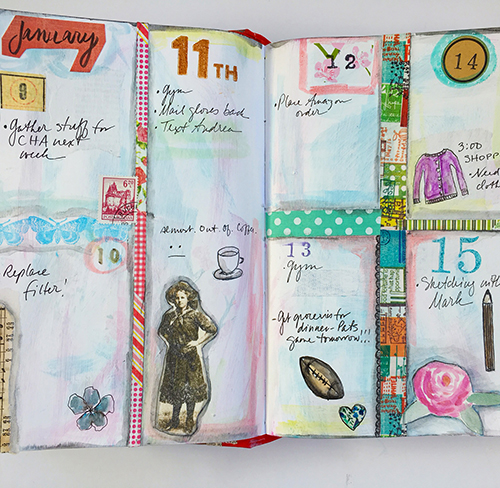
What better time to get organized and start a new planner? I was so taken by the planner featured in the article “Creative Days Ahead” by Dawn DeVries Sokol in the January/February issue of Cloth Paper Scissors magazine that I had to make one for myself. It seemed like the perfect project for Studio Saturdays.
If you haven’t caught planner fever, this project will convince you to get on board. Keeping a planner like this isn’t just about writing your to-do list; it’s about making something unique, using your favorite supplies and techniques, and documenting your creative life.


This Create Along series is in three parts: In Part One we’ll create the cover, in Part Two we’ll bind the planner, and in Part Three we’ll decorate the pages, using fantastic collage, painting, and layering techniques. If you’ve never made a book before, you’ve come to the right place. This project uses a repurposed book and a very easy binding stitch, so there’s nothing difficult or intimidating. If you’re a veteran bookbinder or book artist, you’ve also come to the right place. We’ll do some fun techniques for painting and collaging the cover, and the binding stitch is quick and eye-catching.
Let’s get started! Here are the materials you’ll need for Part One. Don’t freak out about the number of supplies—I urge you to use what you have on hand, and to experiment. This is all about making something that reflects you, so feel free to try something different, do a variation on a technique, or break free altogether. Some supplies, as you’ll see below, are optional.
• Book with an intact spine about 2″ wide: A book bound for the recycling center is great for this project, but make sure the book is sturdy, and the spine is not split or coming apart from the covers. The spine width is important—make sure it measures about 2″. The book I used is 6″ wide x 9 1/4″ high.
• Utility or craft knife
• Scissors
• Sandpaper
• Ephemera, such as book pages
• Regular gel medium
• Paintbrushes
• Gesso (optional)
• Acrylic paint, white or ivory, and burnt umber, plus a variety of other colors in dark, medum, and light values
• White chalk pencil (optional)
• Paint pen (optional)
• Black permanent pen (optional)
• Baby wipes or paper towels
• Stencil
• Cosmetic wedge
• Soft gel medium, gloss or matte, or acrylic glazing medium (optional)
• Palette paper or palette
• Palette knife (optional)
• Acrylic ink (optional)
• Stabilo Woody Crayon, black (optional)
• Number stamps (optional)
• Stamp pad, black, permanent (optional)
Quick tip: When choosing the book for your planner, think about where and how you’ll use it. If you want to carry it with you, choose a small size. I knew I’d be keeping mine at home, so I went with a fairly big book—I also wanted larger pages to work on.
To remove the text block (the pages) from the spine, pull on one of the covers while holding the text block, and you’ll see them start to separate. Put the tip of the craft or utility knife blade in between the cover and the endpaper, and start cutting downward, making sure your hand is out of the way. Also make sure that you’re not cutting into the spine or any part of the book. Repeat for the other cover, and reserve the pages for later. Clean up any jagged edges along the inside of the spine with a craft knife, scissors, or sandpaper.

The book I’m using was a prop leftover from a photoshoot, and it had been painted red. I left it that way because I already had the color in my palette. You can leave your cover the way it is, or, if you want to cover it completely, brush on one or two coats of white gesso and allow it to dry completely.
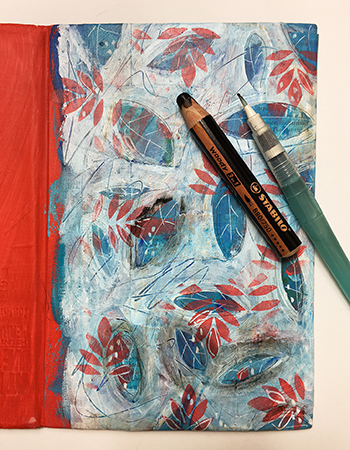
Collage some papers on both covers, leaving the spine intact. I used a variety of book text, but use whatever you have that’s interesting and has some contrast—this layer will show through, so papers with some kind of pattern is good. I adhered the papers with gel medium; allow this layer to dry.

Now it’s time to really have some fun. Paint a great big mess on the planner covers. Really go nuts and layer colors and shapes and brushstrokes, and make marks in the paint while it’s still wet with your fingers or the end of a paintbrush. I started with a palette of blue, teal, and turquoise, and added pops of red for contrast. I mostly used tube acrylics, but fluid works just as well. Use whatever you have on hand. If you’re incorporating complementary colors, wait for one layer to dry before going on to the next so you don’t get mud. If you’ve obscured the collage papers, knock back the paint a little in those areas with a baby wipe or paper towel. Let everything dry.

Choose a design and paint over the first layer with a very light color (I used titanium white). You can freehand it or draw it first with a chalk pencil. Choose an open design that allows the underpainting to show through; I painted leaf shapes. If you have mad painting skills, now’s the time to turn them out. If you don’t, like me, simple shapes are absolutely fantastic, and you can’t go wrong. As before, make marks in the wet paint as you go. If you don’t like something, a baby wipe will take it right off. Let dry.

Here are the planner covers after the second layer of paint. I drew some veins in the leaves with a paint pen. Also, you’ll see that I didn’t go completely up to the spine. That’s because we’ll be covering it later.

For the next layer, choose a stencil with a pattern that complements your design. With a palette knife, mix some acrylic paint with soft gel medium or glazing medium in a 1:1 ratio; I did this because I wanted the paint to be somewhat translucent, but you can just use the paint straight. Dip a cosmetic wedge in the paint, pounce some of it off, and stencil onto the cover, however you want the pattern to appear. Let dry. When my cover was dry, I outlined some of the stencil shapes and created some random dots with a white paint pen, and outlined the leaf shapes with a black permanent pen.

With a palette knife, blend a small amount of burnt umber paint and soft gel medium or glazing medium in a 1:1 ratio. Dip a paper towel into the mixture and lightly swipe it across the covers. I wanted to create a bit of depth and warmth with this layer, so I didn’t use a lot. A baby wipe will be your salvation if you apply too much.

The next step happened because I made a big goof. Big. I thought the planner cover would look cool if I dripped some dark blue acrylic ink on it, but the drips were so large and ugly that I panicked and grabbed a baby wipe to try to take the color off. In the process of wiping it, I created a beautiful blue stain. This became one of those happy accidents that I will now use in a future project. Try this technique if you’re feeling up for it, but you can also skip it.
I don’t know if you’ve discovered Stabilo Woody Crayons, but if you haven’t, you should check them out. These big fatties are water soluble, and you can draw with them, or hit them with a wet paintbrush or water brush and get beautiful watercolor effects (Spoiler alert: I used them for my planner pages as well.). I used a black crayon with a water brush, painting around the leaf motifs, waiting about 30 seconds, and then rubbing in the color with my fingers. This created a kind of shadow/stain effect that I absolutely love. You can also get this effect with a black Stabilo All pencil, or plain watercolor.
I wanted to represent the year of this planner, so I stamped 2017 with the Montreal Large Numbers set by Michelle Ward, using permanent ink. Since the cover is textured I didn’t get solid impressions, so I filled in the spaces with a black permanent pen. I liked the way the zero looked, so I left that as is. I then added some dots on top of the numbers with the white paint pen, and enhanced some of the dots on the cover so they’d pop a bit more.

Quick tip: To hasten dry time, use a heat tool. Be careful not to heat the area too much—acrylic paint can start bubbling.
Since I’ll be using this planner for a year, I need it to be sturdy. In the next installment we’ll reinforce the spine, collage the inside covers, and also bind the book. So you can get ready for next week, here’s what you’ll need:
• A piece of bookcloth 1 ½” taller than your cover and 2 ½” wider than the spine. Bookcloth can be found in some art supply stores, and online. You can substitute fabric, but if so, you’ll need dry adhesive, such as Grafix Artist-tac Permanent Dry Adhesive.
• PVA glue
• Glue brush
• Waxed linen thread, 4-ply, about 7 yards
• Bookbinding needle (you can substitute a sturdy darning needle)
• Bone folder
• Paper for the pages. Determine how you want to use your book, and choose your paper accordingly. I wanted to use wet media, so I chose 98-lb. paper from a Canson XL Mix Media pad. You’ll need 35 folded sheets. To determine the size for your planner, measure the pages from the text block. If those aren’t available, subtract ¼” from the height of the book, and measure from the flattened spine to the front edges of the cover (called foredges), and subtract ¼”. Your pages will be that height x double the width, and then folded in half. Based on my dimensions, my pages are 12″ wide x 9 1/8″ high. You’ll need 36 folded sheets.
• Scissors
If you have any questions on the techniques or supplies, please leave them in the comments. See you next Saturday! In the meantime, if you’d like to learn more about this article and other book-related resources, take a look at these great products from the North Light Shop.


Have a technical question?
Contact UsJoin the Conversation!