Paint Dramatic Clouds in Watercolor | Step-by-Step Demonstration
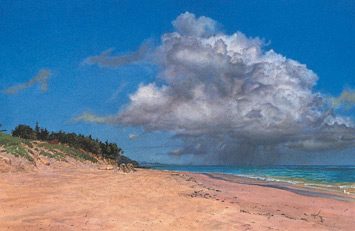
Elbow Beach (watercolor, 10×14)
Private Collection
For some people clouds are inscrutable, amorphous objects. Getting them to look both solid and soft at the same time is a real challenge. The cloud in this demonstration is an example of the dramatic cloud formations that are frequently a part of the Bermuda landscape.
Five-Step Cloud Demonstration
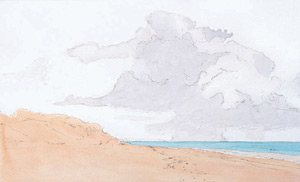
1. Paint the Underpainting
After you have done the basic drawing of the water, beach and cloud, apply a wash to the cloud with a mixture of cerulean blue, ultramarine blue, burnt umber and a touch of Winsor violet. This underpainting on the white of the cloud will help it appear as if it is in the distance.
Tip: When painting your graded washes, don’t be overly concerned if streaks appear in the sky. Everything is masked off, and you can blend everything with a large flat wash brush. An inexpensive brush will work just fine. At this point you could even use a squirt bottle to soak the paper and blend the sky until you are satisfied.

2. Apply Masking
Mask the foreground and the whitest part of the cloud.
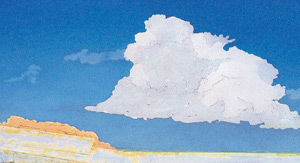
3. Soften the Contour of the Cloud
Paint a flat wash of cerulean blue over the entire sky with a 1-inch flat. Begin a series of graded washes for the sky using a combination of cerulean, ultramarine and Winsor blues. Make the sky lighter at the horizon to give the sky depth.
After you’ve applied a couple washes of the blue mixture, put a little more masking fluid on the slightly darker parts of the clouds and continue to apply the washes. Remove all masking fluid from the cloud with a rubber cement pickup.
Tip: If you take time to observe a clear blue sky, you will notice that the sky is a lighter and sometimes different hue of blue toward the horizon. With careful observation you may also notice that higher in the sky, as the color deepens, that it appears lighter on one side or the other. This is because one side is closer to the position of the sun and will thus appear lighter than the other side. This effect is more apparent in the morning and afternoon than it is at midday when the sun is at its highest position. Incorporating these two observations into your work will give even a clear blue cloudless sky greater depth.
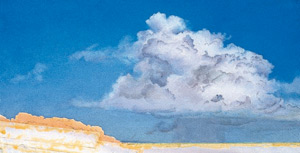
4. Develop the Interior Portions and Create Patterns
Soften the contour of the cloud with a combination of three techniques. First, using a Pink Pearl eraser, go over the edges of the cloud (make sure the paper is completely dry when you do this). Then, using a synthetic brush, scrub the edges of the cloud with clear water, being careful not to scrub too much at one time or you may damage the paper. Be prepared to dry the paper with your hair dryer and try this scrubbing technique again. Use your sable brush to dampen the edges of the clouds, then drop in more of the sky mixture, letting it blend into the edges of the cloud.
Begin to develop the rain falling from the bottom of the cloud with a physical mixture of burnt umber and cerulean blue. Turn your attention to developing the interior portions of the cloud. Use the color mixture for the sky plus burnt umber and a little Winsor violet. Add this to the mixture used to paint the falling rain. Dampen areas of the cloud with clear water and drop some color on these areas. Also apply color to dry areas and take clear water to soften the edges of each facet of the cloud.
Periodically dry everything with a hair dryer and then repeat this process. From time to time, after the sky has been thoroughly dried, use a squirt bottle to spray the whole sky and gently blend everything with your largest flat brush. Vary the combination of colors as you develop the cloud. Mix up the aforementioned techniques and look for interesting patterns as the cloud develops.

5. Integrate the Cloud and Sky
Remove the mask from the rest of the painting and develop this area so it integrates with the sky. Using Chinese white is an option. Use a few small touches of it in this painting near the horizon, on top of the previously painted falling rain. If you prefer not to use any white, those spots can be either picked out with a Pink Pearl eraser or scrubbed out with a synthetic brush. At this time, you may wish to go over some or all of the cloud with Chinese white to further soften it. I didn’t do that for this demonstration, but you may wish to experiment with that technique and see if it is to your liking.
Materials List
Colors:
- burnt umber
- cerulean blue
- Chinese white
- ultramarine blue
- Winsor blue
- green shade
- Winsor violet
Brushes:
- Nos. 3, 4 and 5 sable rounds
- No. 4 synthetic round
- 1-inch (25mm) flat wash brush
- large flat wash brush
- old brush (for masking)
Other Materials:
- frisket paper
- liquid masking solution
- Pink Pearl eraser
- rubber cement pickups
- white artist’s tape
James Toogood, a signature member of the American Watercolor Society and the National Watercolor Society, teaches at the National Academy School of Fine Arts, in New York City; the Pennsylvania Academy of the Fine Arts, in Philadelphia; and Perkins Center for the Arts in Moorestown, New Jersey. His video, Incredible Light and Texture in Watercolor, is available at www.artistsnetwork.tv. His DVD of the same title is available at www.northlightshop.com.
Related Book, DVD Workshop and Magazine Article:
Find out about James Toogood’s DVD, Incredible Light and Texture in Watercolor.
Check out the table of contents for the September issue of The Artist’s Magazine here.
MORE RESOURCES FOR ARTISTS
• Watch art workshops on demand at ArtistsNetwork.TV
• Online seminars for fine artists
• Instantly download fine art magazines, books, videos & more
• Sign up for your Artist’s Network email newsletter & receive a FREE ebook

Have a technical question?
Contact UsJoin the Conversation!