Plein Air Landscape Painting: Your Guide to Getting Started

Make the most of your first thirty minutes for successful plein air landscape painting. Plus, a roundup of plein air essentials with expert tips and techniques!
Wondering how to paint successfully when light and weather change quickly? This step-by-step guide to creating a plein air landscape painting will help. Whether you’re a beginner or experienced plein air painter, try this methodical approach! Next, don’t miss our round-up of our best articles on plein air gear and getting started in any medium, below. Then get outside! — Artists Network Staff
How to Start a Plein Air Painting
by Michael Chesley Johnson
There are few things more intimidating to a painter than a blank canvas. It’s even worse when the painter is out in the field and the clock’s ticking. The sun moves and shadows shift; clouds rise and thicken. Although there are several ways to begin a plein air landscape painting, the best way is the one that deals with the time issue right off the bat.
If you’ve painted en plein air, you’re probably familiar with the process of using a viewfinder to isolate your scene, followed by creating a thumbnail sketch to work out the design and values, and finally laying in an underpainting based on your sketch. These are important first steps because they create the foundation for the actual painting.
Time Management for Plein Air Landscape Painting
But what you may not realize is that there’s a time limit to this process. Once you’ve finished the thumbnail sketch, you should take no more than 30 minutes to transpose the sketch to your canvas and create the underpainting — no matter whether your canvas is 9×12 inches or 24×30 inches. The underpainting fixes in place shadow patterns and, thus, the design. It’s an essential snapshot, so don’t ignore this part of the process.
After this first 30 minutes, the shadows may change significantly. On an overcast day, of course, the shadows change little, and you’ll have much more time. But on a sunny or partly cloudy day, it’s imperative that you don’t “chase the light,” or you’ll end up with more of a time-lapse painting than a snapshot of your scene. In other words, you’ll display an inconsistency in the lighting of your subject that will confuse your viewer.
But after that 30-minute underpainting is done, you’ll have plenty of time to finish your plein air landscape painting! You can spend the rest of your painting session adjusting shape relationships and then adding detail, if needed. Let me show you how this works.
Step 1: Select a Scene

Finding an appealing scene that also makes a good painting can be difficult. Occasionally, you find a scene that satisfies both criteria right away, but other times you have to work at it. I like to explore with a camera and sketchbook prior to a painting session in order to get a head start on the process.
Step 2: Experiment With Formats

Once I have a general idea of a scene that I think will work, I use my ViewCatcher to try a variety of formats and compositions. You can make your own view-finding windows out of cardboard, but the ViewCatcher has a sliding piece that adjusts the window size, allowing me to match the window proportions to different common formats, such as 9 x 12 inches. For this painting, I decided to focus on a distant rock with a clump of trees.
Step 3: Create a Template
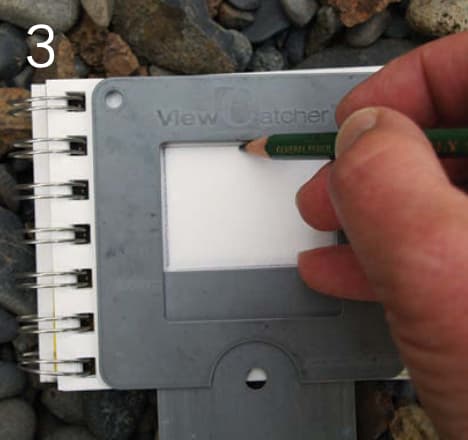
After selecting my scene and an appropriate format, I use my ViewCatcher to create a small template that I then use to work out my values. If the complexity of the design requires a larger sketch, I scale the rectangle to a larger size.
Step 4: Establish Values
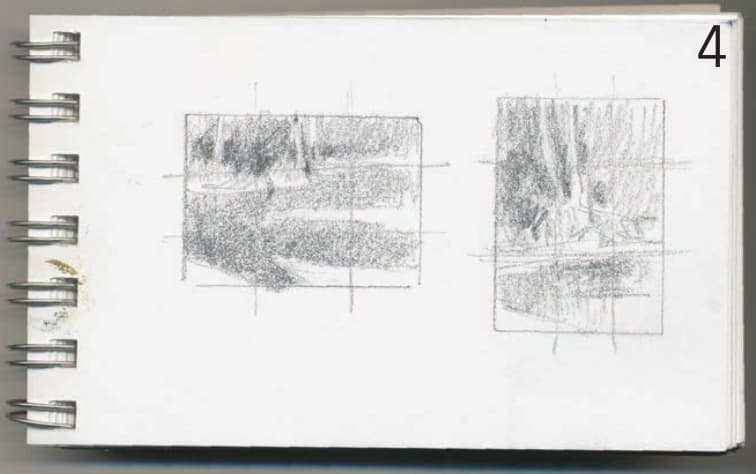
I try different value ranges, using no more than four values in each thumbnail. I also keep the shapes few and simple at this point, and don’t get caught up in branches and twigs. A soft 6B pencil lets me make very dark darks. By the way, if, at this stage, you find your- self making a line drawing, you’re going about it wrong. Instead use simple shapes.
Step 5: Transpose the Design

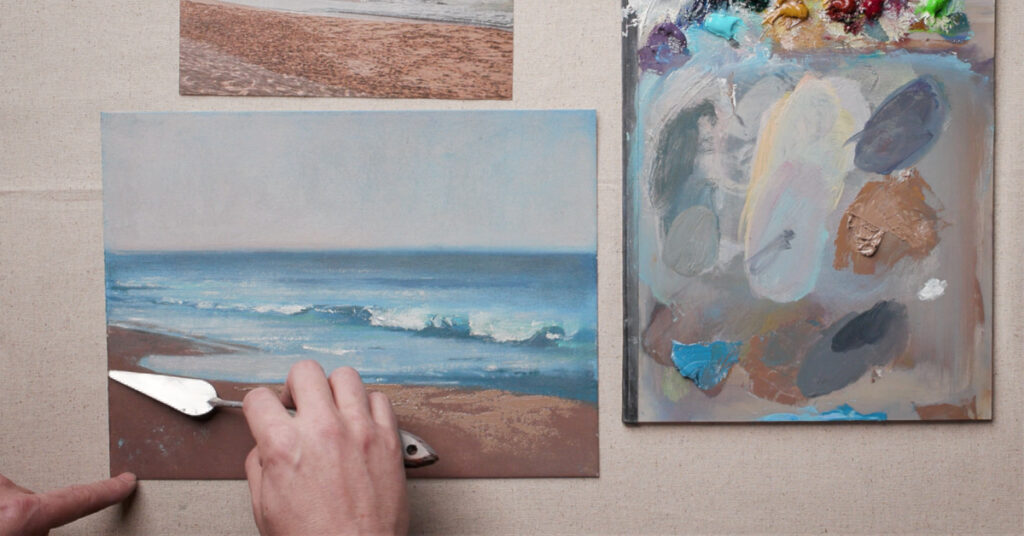
Finally, employing a simple grid system, I transpose the design to my canvas with a small brush. Here, I’m using a thin mixture of ultramarine blue and cadmium red to outline the shapes. This mixture makes a warm purple-brown that can enhance the greens in the plein air landscape painting (I may use other colors under other circumstances). My design is very sketchy, but it shows all the major shapes and the important landmarks in the scene.
Step 6: Block In the Underpainting
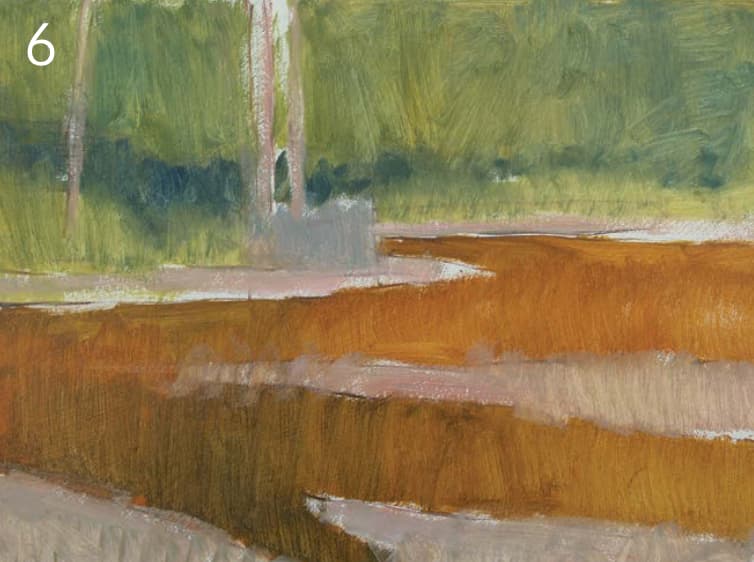
Next, I underpaint the shapes with the average value and color temperature of each. The average value is important because it establishes the pattern of light and shadow. Color temperature — the warmth or coolness of a color — is more important than the exact hue because temperature enhances the sense of light and shadow; temperature can create a sunny day or an overcast one.
As for the actual hue, I just make my best guess. Knowing I’ll adjust color in the next stage, I don’t agonize over it at this point in my plein air landscape painting. I’m aware, however, of the clock and the shifting shadows, and I try to get this block-in done in a half hour or less. Notice that my underpainting has virtually no detail.
Once the underpainting is complete, I step back and review what I’ve done. I can take my time now because I’ve established the pattern of light and shadow as well as the color temperature of the shapes. The scene will continue to change as I paint, but from this point, I’ll be referring to the scene only for details.
Step 7: Adjust Value, Temperature, and Hue
As I review the painting, I look at each shape and compare it with its neighbor with respect to value, temperature, and hue. Should a particular shape be a little darker, cooler, and bluer? Should its neighbor be lighter, warmer, and redder? I make each adjustment, as necessary, but still stick with the large, simple shapes.
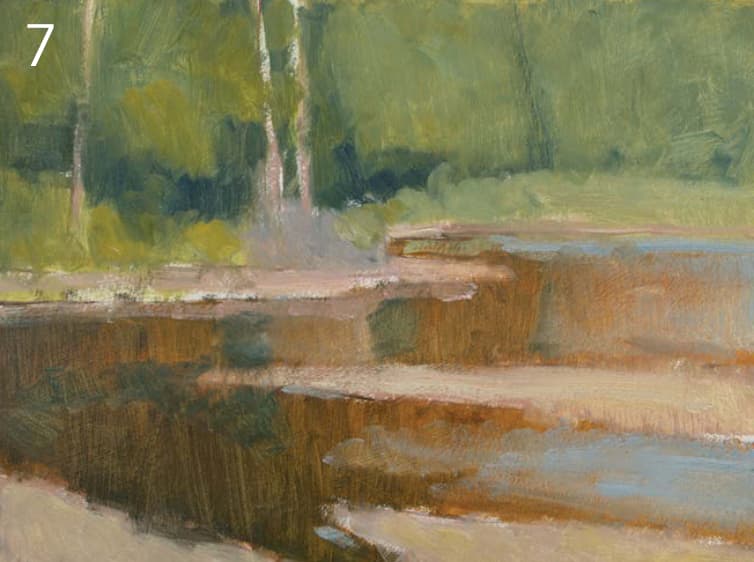
I work my way toward an abstract plein air landscape painting that accurately depicts the simplified shapes I see before me as well as their relationships to each other. You can see where I darkened the water and warmed some of the closer vegetation.
Step 8: Add Detail
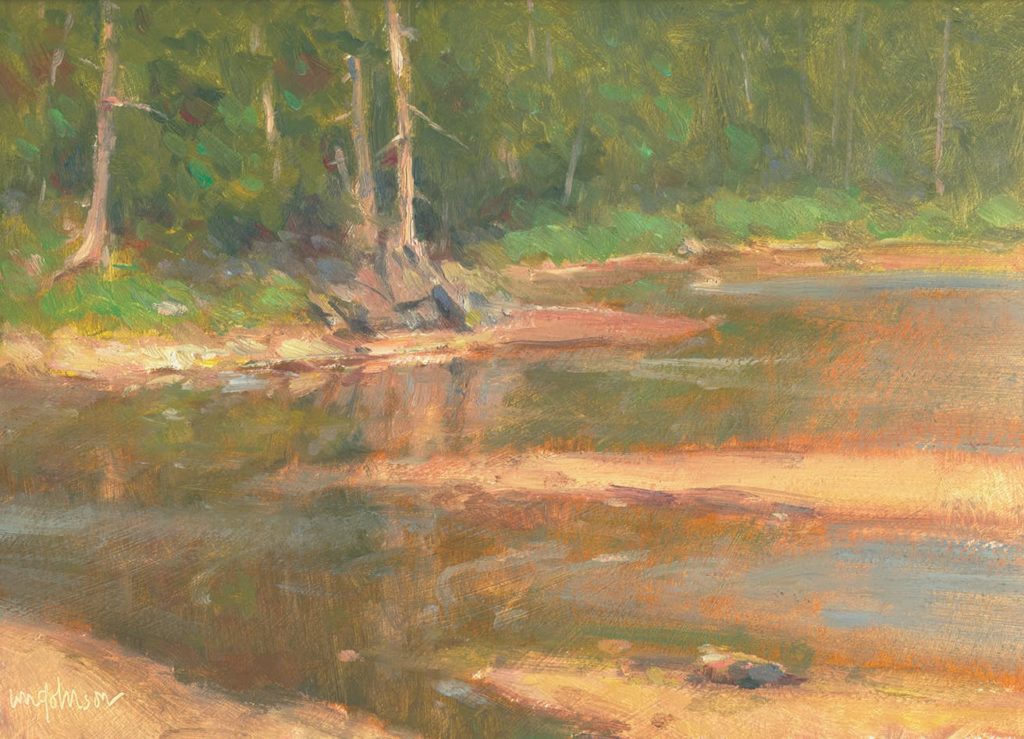
When I’m done adjusting shape relationships, I have options for how to proceed. I can either continue to add detail and refine what’s happening within each shape. Or I can stop and continue the work later, coming back to the scene under similar lighting and weather conditions. I took this piece as far as I could in the field before heading back to the studio; had I stayed any longer, the lighting would have changed so much that the scene would appear significantly different from what had captured my eye in the first place. The painting was close to being finished, so I signed it.
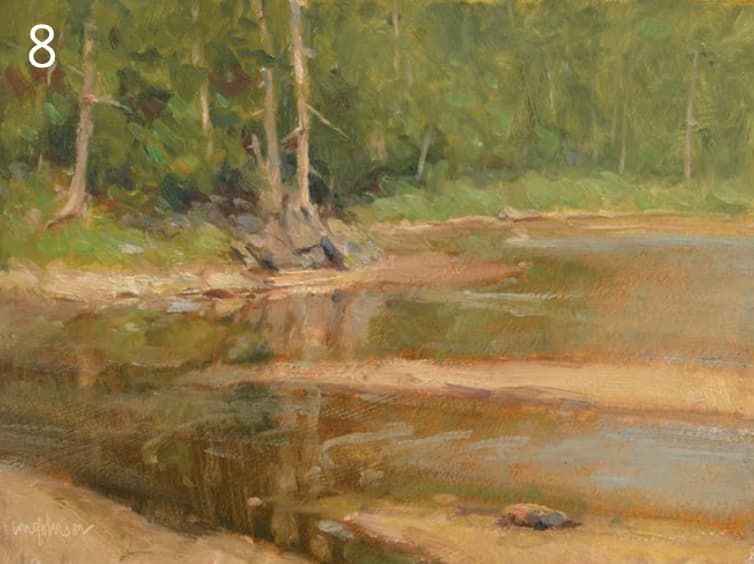
Step 9. Apply Finishing Touches

Back in the studio, I can examine the painting at leisure and make small adjustments. In this case, I punched up the highlights a bit, deepened the shadows around the central clump of trees, and softened the reflected verticals. This completed Tidal (oil, 9×12), above.
I’ve found that my methodical approach to starting a plein air painting really takes the pressure off. And after all, for many of us, painting is supposed to be relaxing!
MICHAEL CHESLEY JOHNSON is a former contributing editor for Artist’s Magazine, where a version of this article first appeared. Michael is a full-time painter and the author of Through a Painter’s Brush: The American Southwest — Painting the Four Corners States and Backpacker Painting: Outdoors with Oil & Pastel. Learn more at mchesleyjohnson.com.
Roundup: Plein Air Essentials for Every Painter
Gearing Up
If you’re new to plein air painting, or need a refresher, begin with our Artists Network free downloadable guide to plein air painting. Then, you’ll want to assemble some gear. Check out our experts’ suggestions, start out with just the basics, and expand as you define your painting approach and your budget. Whatever your medium, a plein air practice will make you a better artist.
- Michael Chesley Johnson, author of the demo above, has tips on basic supplies and an extensive list of suppliers for your wish list in Plein Air Gear Suppliers.
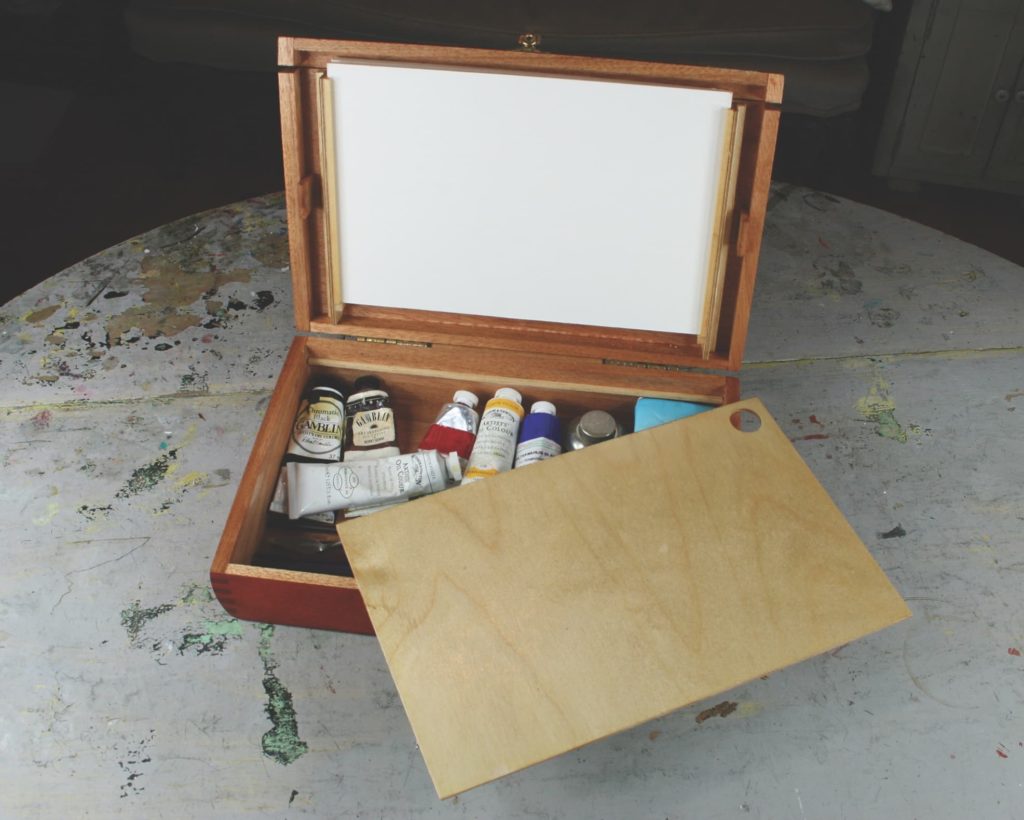
- If you have basic woodworking skills, try making your own DIY pochade box.
- You might not think about things like bugs and snacks until you’re far afield; Plein Air Art Hacks to Improve Your Outdoor Art Experience is here to remind you!
Advice from the Field
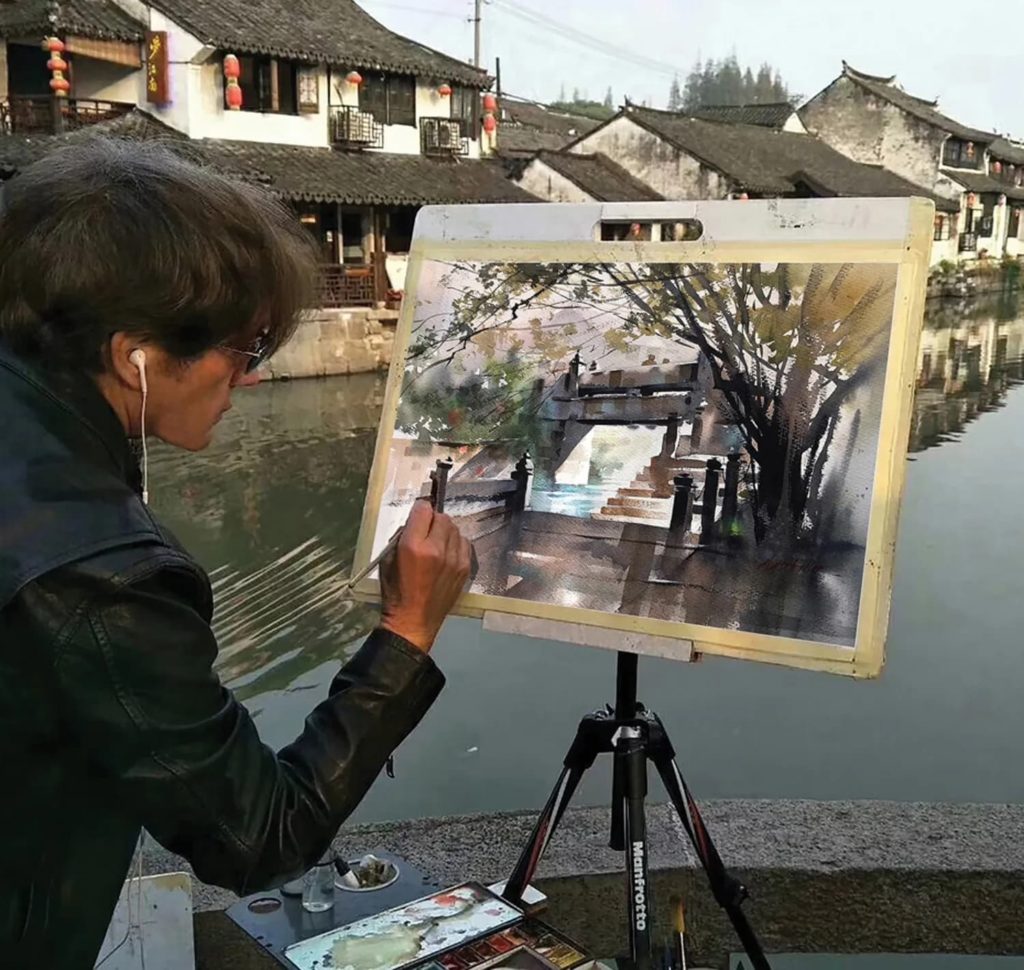
Now that you’ve gathered supplies (and don’t forget water, snacks, hat, and sunscreen), it’s almost time to get out there and paint. First, though, we’ve got great advice from those who’ve tested themselves out in the field.
Tips for Watercolor Painters
- 8 Plein Air Painting Tips from Today’s Watercolor Pros
- Plein Air Techniques: Land, Sea and Sky from watercolorist Catherine Gill
- Watercolorist Thomas Schaller achieves The Zen of Traveling With Art Supplies, whether painting en plein air or traveling.
Tips for Pastel Painters
- Plein Air Painting in Pastel: Plein Air Painters Tell You What You Need to Know , including advice on a space-saving limited pastel palette.
- Check out the basic kits of five artists in Plein Air Setups for Pastels, then visit Plein Air Pastels: A Gallery.
- Get inspired by Pastel Landscape Painting in the National Parks, wherein Doug Tweddale takes his pastels, his plein air kit, and his wife on a big road trip.
Tips for Oil Painters
- How to Paint in Plein Air: Beginner Landscape Techniques from oil painter Frank Serrano.
- Painting en plein air in oil means you’ll need to know How to Travel With a Wet Canvas.
- If you’d like to work large, don’t miss 11 Tips for Painting En Plein Air by oil painter Joe Paquet.
Paquet’s last tip might be the most important of all for every painter: “Be patient, grateful and humble. Just to have the opportunity to paint is a gift … Keep your heart open and your hand sure.”


Have a technical question?
Contact UsJoin the Conversation!