✓Showcase your talent and win big in Artists Network prestigious art competitions! Discover competitions in a variety of media and enter for your chance to win cash prizes, publication in leading art magazines, global exposure, and rewards for your hard work. Plus, gain valuable feedback from renowned jurors. Let your passion shine through – enter an art competition today!
We are rarely in absolute darkness. Even in our beds at night, complete darkness eludes us. Moonlight creeps in through windows. Our electronic devices flash and glow.
It’s easy to forget light is an intruder in the indigenous darkness. Light requires energy; darkness is the default. And, when drawing, a white piece of paper represents a blinding light. We darken almost every part of our subject until the page is covered with a variety of values. Only the brightest highlights are left white. This common method of shading inverts the natural state of darkness and can hinder a student’s understanding of how light actually operates.
A shadow is an absence, a lack of light. Shadow has no mass, speed or any other physical characteristics.
Light, on the other hand, is an active, measurable substance. Light is made of minuscule elementary particles called photons. Photons stream out from a light source and illuminate any object or surface in their path.
So how can an artist successfully capture a realistic sense of light when drawing? By using white pencil on black paper.
Enjoy this drawing tutorial from artist and instructor Brent Eviston and click here to access his online course on Figure Drawing Essentials, available now!
Drawing with Light
Drawing with white pencil on black paper simulates drawing with light itself. The white particles of pigment on a black piece of paper act as photons in a pitch black room. This process gives you a visceral sense of how photons illuminate every object and surface in their path and leave everything else in shadow.
Using white pencil for the first time is challenging because the urge to draw the shadows is strong. Most students habitually press harder on the pencil for darker values and decrease pressure for lighter values. However, when drawing with white pencil, the opposite is true. The harder you push, the lighter your values will be.
Doing a value scale will help you prepare your hand and mind for drawing the light and leaving shadows dark. With that being said, before attempting to draw complex forms like figures or landscapes, I recommend first drawing a basic volume.
Mastering the White Pencil Technique
In the following demonstration, I will take you through the steps I use when drawing on black paper. My subject will be an egg lit by a single light source. I’ve provided a lighting diagram, below (Figure 1), for you to refer to as we go through this process.
Figure 1What you will need:
I’m drawing on Black Canson Mi-Tientes paper with a white Derwent Drawing Pencil. I also have a kneaded eraser for gently lifting pigment as well as a white plastic eraser for the complete removal of pigment.
Now, let’s get started.
1. Know the Drawing Mantra
Figure 2
I have a mantra I always keep in mind. Through two decades of teaching, I have no doubt uttered it thousands of times. My students report that they hear my voice in their heads repeating this phrase as they draw:
Big to Small. General to Specific. Simple to Complex.
This saying works for drawing, as well as for life. So for this exercise, keeping this mantra in mind, I start by drawing the basic shape of the egg, the cast shadow and the line of termination that divides the lit portion of the egg from the part left in shadow.
One of the most common missteps I see students make is attempting to render light and shadow before they have accurately drawn these deceptively simple elements. This basic framework will serve as the foundation to build a subject of a drawing using light.
Once I’m confident the shape, size, shape and placement of these elements are correct, I move on to the lighting process.
2. Let There be Light
Figure 3
In the image above (Figure 3), I’ve laid a light wash of pigment on the portion of the egg that gets hit by direct light. The single light source is positioned above and to the right of the egg. Therefore, the upper right section of the egg is brightly lit and progressively dims as it approaches the line of termination.
I have also brightened the highlight to establish the high end of the light spectrum. The highlight is the only place I will press the pencil to its brightest limits.
Finally, I have laid a blanket of light on the surface the egg is resting upon, leaving the shadow cast by the egg in darkness. This clear division between light and shadow must be maintained as we add subtlety and complexity to the lighting scheme.
3. Work on the Shadows
Figure 4
A shadow by definition is any area that doesn’t receive direct light. But most shadows do contain either reflected or ambient light. This fact is easy to miss while shading on white paper. In the final drawing (Figure 4), I have added light in the shadows.
Notice the dark band of shadow directly under the line of termination. This is called the core shadow, and it is the darkest value on the egg itself. However, it is not completely black. It is darkest on the left and gently brightens toward the right as it approaches the light source.
The light increases under the core shadow, near the bottom of the egg. This is because the light ricochets off the surface the egg is sitting on and reflects back up, softly illuminating the bottom of the egg. This area is called reflected light. Despite the amount of reflected light it receives, it is technically a shadow because it is not receiving direct light. The reflected light also helps to brighten the right side of the core shadow.
Underneath the egg, is the part of the cast shadow called the occlusion shadow, meaning it is the only part of this drawing that is completely devoid of the white pencil. The light cannot find this area of shadow, leaving the paper completely black.
Now, take a look at the far left edge of the cast shadow. You can see a small amount of light softening the cast shadow’s edge. The edges closest to the egg are sharper, but as the cast shadow travels away from the egg the edge becomes softer and more diffused.
From this point in the drawing process, the values can be refined until the desired levels of detail and realism have been achieved.
4. Work from Simple to Complex
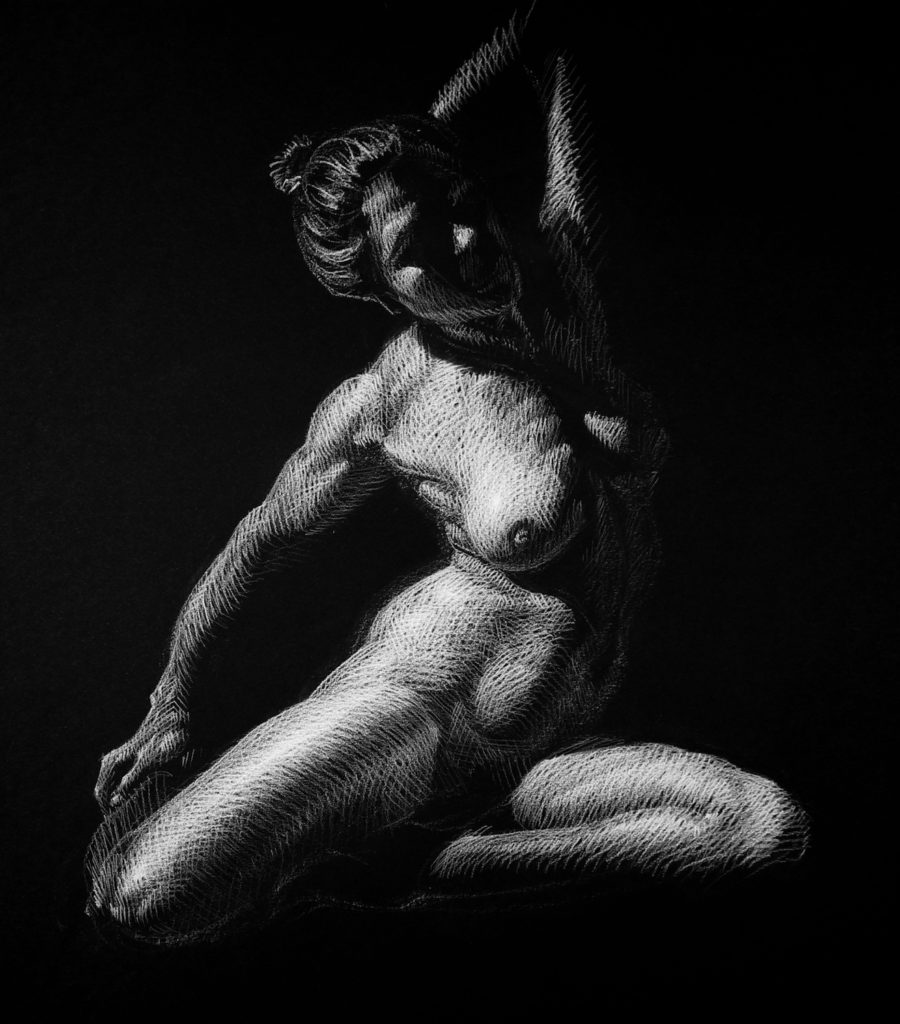
Once you’ve gained experience and confidence working with white pigment on a black surface, you can increase the complexity of your subjects. For instance, in the drawing of this female figure (Figure 5), I’ve used a high contrast style of crosshatching where every hatch mark is visible. The resulting figure appears to be woven from strands of light. I have intentionally left many parts of the figure unfinished creating the illusion of form emerging from the dark.
Figure 5
Most drawings I create, for both exhibition and enjoyment, are drawn with dark pigment on white paper. However, when I want to study light, I draw on black paper and render light with white pencil.
Understanding light and successfully depicting it is a critical skill every representational artist must master. It is also a prerequisite to working with color.
Watching a lit form slowly emerge from the darkness of the page is a profound drawing experience, one which allows you to gain a deep understanding of the laws and logic of light in a way that darkening shadows on white paper cannot.
Meet Brent Eviston
Drawing has always been Brent Eviston’s passion as well as his primary medium of expression. He has been teaching drawing for more than 20 years at studios, museums galleries and schools throughout California.
In 2016, he began adapting his sought-after studio drawing classes to create a series of online drawing and figure drawing courses. His drawing video courses have been taken by thousands of students in more than 90 countries.
Want to try out some of Eviston’s figure drawing techniques? Pick up his Figure Drawing Essentials Course, which includes all you need to know about gesture, shape, anatomy and form. It is a masterclass that can be yours in an instant! Get this online course now!
Quite a complex amount of shadowing from a very basic shape.
As I am only just learning the complexities of drawing, it is very good Practise exercise.
Thank you.
We use cookies to optimize our website and our service.
Functional cookies
Always active
The technical storage or access is strictly necessary for the legitimate purpose of enabling the use of a specific service explicitly requested by the subscriber or user, or for the sole purpose of carrying out the transmission of a communication over an electronic communications network.
Preferences
The technical storage or access is necessary for the legitimate purpose of storing preferences that are not requested by the subscriber or user.
Statistics
The technical storage or access that is used exclusively for statistical purposes.The technical storage or access that is used exclusively for anonymous statistical purposes. Without a subpoena, voluntary compliance on the part of your Internet Service Provider, or additional records from a third party, information stored or retrieved for this purpose alone cannot usually be used to identify you.
Marketing
The technical storage or access is required to create user profiles to send advertising, or to track the user on a website or across several websites for similar marketing purposes.
Please note:
This action will also remove this member from your connections and send a report to the site admin.
Please allow a few minutes for this process to complete.


 It’s easy to forget light is an intruder in the indigenous darkness. Light requires energy; darkness is the default. And, when drawing, a white piece of paper represents a blinding light. We darken almost every part of our subject until the page is covered with a variety of values. Only the brightest highlights are left white. This common method of shading inverts the natural state of darkness and can hinder a student’s understanding of how light actually operates.
A shadow is an absence, a lack of light. Shadow has no mass, speed or any other physical characteristics.
Light, on the other hand, is an active, measurable substance. Light is made of minuscule elementary particles called photons. Photons stream out from a light source and illuminate any object or surface in their path.
So how can an artist successfully capture a realistic sense of light when drawing? By using white pencil on black paper.
Enjoy this drawing tutorial from artist and instructor Brent Eviston and click here to access his online course on Figure Drawing Essentials, available now!
It’s easy to forget light is an intruder in the indigenous darkness. Light requires energy; darkness is the default. And, when drawing, a white piece of paper represents a blinding light. We darken almost every part of our subject until the page is covered with a variety of values. Only the brightest highlights are left white. This common method of shading inverts the natural state of darkness and can hinder a student’s understanding of how light actually operates.
A shadow is an absence, a lack of light. Shadow has no mass, speed or any other physical characteristics.
Light, on the other hand, is an active, measurable substance. Light is made of minuscule elementary particles called photons. Photons stream out from a light source and illuminate any object or surface in their path.
So how can an artist successfully capture a realistic sense of light when drawing? By using white pencil on black paper.
Enjoy this drawing tutorial from artist and instructor Brent Eviston and click here to access his online course on Figure Drawing Essentials, available now!


Quite a complex amount of shadowing from a very basic shape.
As I am only just learning the complexities of drawing, it is very good Practise exercise.
Thank you.