Drawing Facial Hair
Lifelike hair is an indispensable feature of a natural-looking portrait. Hair and facial hair is not only a key indicator of how skillful a realist the artist is, but its also one of the most expressive parts of a persons body. Perhaps because its both so adaptable and so prominent in our appearance, the way we wear our hair and our facial hair can reveal a lot about our character, whether we want it to or not. So if you really want to capture the essence of a person in a portrait, try starting with this easy three step guide to drawing facial hair with added tips on drawing hair.
At first glance, facial hair may seem like one of the most difficult parts of the human figure to draw, with its subtle layers and textures and colors. But if you learn to view it not as an endless collection of individual hairs but an overall unit made up of a series of shapes, you’ll find it much easier. Here you will find a 3-step demo on drawing facial hair like a mustache or beard plus tips for drawing a believable head of hair.
More Resources on Drawing Faces and People
Drawing the Curve of Cheeks, Chins and Noses Drawing Hair
Drawing Faces: A Beginner’s Guide Avoid 5 Mistakes When Drawing Portraits
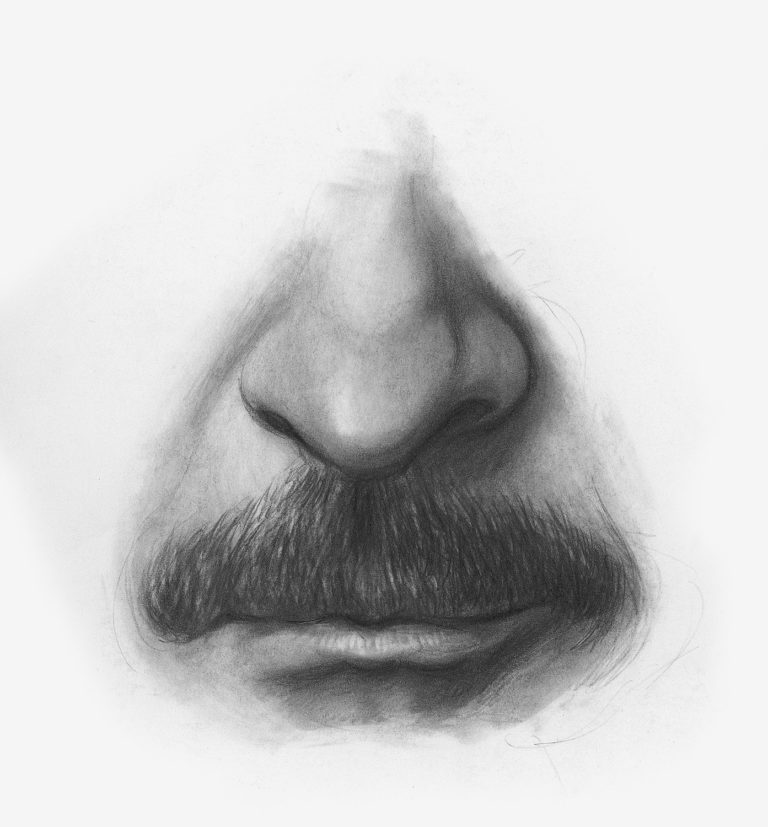
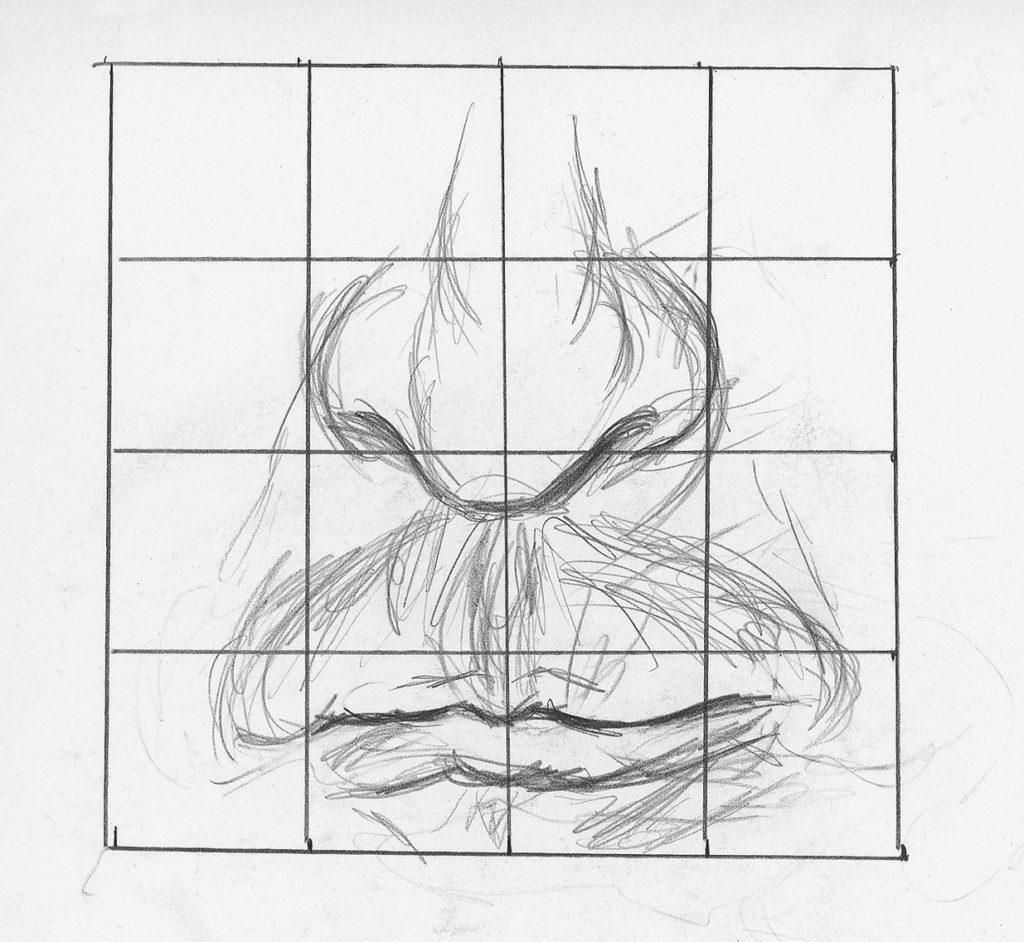
Drawing Facial Hair in 3 Steps
1. Create a Line Drawing
Use the grid method and a mechanical pencil to create a line drawing of a nose, mouth and mustache.
2. Build and Blend the Dark Tones
When you are sure of your accuracy, carefully remove the grid lines with a kneaded eraser. Apply the darkest tones with a pencil.
The mustache is created with short pencil lines going the direction of the hair’s growth. Blend the entire area to a gray tone with a tortillion and then continue building pencil lines on top.

3. Deepen the Tones, Blend and Lift
Continue deepening the tones and blending the drawing for a smooth appearance. Once the darkness of the mustache is achieved, use a kneaded eraser to lift out some light hairs. This will help it look full and dimensional.

Drawing Facial Hair — More Tips
+When you have the occasion to draw facial hair, keep in mind that it doesn’t differ all that much from other hair. It’s usually a bit thicker and sparser, though, and you’ll want to pay special attention to blending around the edges. As before, avoid hard edges except in unusual cases.
+When drawing a male mouth, you may encounter facial hair such as a mustache and beard. While it may seem difficult, it is very much like drawing animal fur. Just as with fur, facial hair is drawn using pencil strokes that reflect the length of the hair. It is built up in multiple layers.
Discover more in Drawing Hair in Graphite and Colored Pencil — a free article available from ArtistsNetwork.
Drawing Hair — More Tips
#1 Don’t Chase Strands
A single hair is thinner than the narrowest pencil line you can draw. To create the illusion of drawing each and every hair, ignore all those thousands of separate shafts of hair and concentrate instead on the major shapes in the body of hair. See the hair in this simplified way and then you can draw it this way.
A good way to begin is to close one eye and squint while looking at your model’s head. What do you see? Is it one distinct outline containing an even distribution of mass? Or is it a major shape with several smaller shapes protruding from it? Or is it a roughly consistent series of waves?
Don’t just note the positive shapes but the negative ones, too. Are there any significant gaps in the hair? Where are the major shadows? Answering these questions at the beginning allows you to bypass all the superfluous details and go straight to whats most useful for you as an artist.
#2 Capture the Specifics
Once you’ve identified the shapes that define the hair you want to draw, go ahead and use them to begin your drawing. Lightly sketch in those shapes in the proper relationship to the head so that you’ll have a context to work within, but don’t expect these edges to be permanent.
Experiment a bit with the arrangement and proportion of the hair, and remember that sometimes even the most realistic results don’t come the way we expect them to, so really do experiment with your mark-making.
#3 Always Pay Attention to Lights and Darks
As with almost any subject, establishing effective contrasts between lights and darks is one of the most important aspects of drawing hair, and the best strategy for getting this contrast is to identify the darkest areas and shade them in first.
The lightest areas are already there, in a sense, in the white space of your paper, so it’s best to work your way around them. After you’ve done the darkest parts, continue shading progressively into the lighter patches, and this way you’ll best be able to keep your range of lights and darks consistent.
When you’re working in black-and-white, the lightness or darkness of the hair is just a matter of how heavily and consistently you shade it. Sometimes, however, bright light can be falling on the hair, and dark hair in this situation can be indicated by heavier contrast between these areas and those that aren’t in direct light.
#4 Use Directional Strokes
To build a sense of texture into your shadings, use directional strokes, which both indicate how straight or curly the hair is and give the appearance of individual strands. For most hairstyles your strokes should be largely consistent because the hair will all be falling in generally the same direction, and even the smallest variations can be enough to give the hair a natural or tousled look.
When you get to the outer edges of the hair, don’t be afraid to let the hair fade into the background. Rarely does a persons hair have a hard visual edge to it, and letting the viewer see the hair get thin and wispy can be a great touch of realism.
#5 A Little Variety But Mostly the Same
Although there seem to be plenty of different types of hair in the world (almost as many as there are types of people), don’t be intimidated by this notion. The styles may change a great deal, but in all but the most extreme and artificial cases the fundamental properties of human hair don’t change much. The most visible differences are in color and curliness.
To draw curly hair, try using circular shading instead of the one-directional or back-and-forth methods, and be sure to do this from the very start. It’s more painstaking and often time-consuming, but it’s worth the effort if you want a naturally curly look.
For extremely curly hair—you may want to forego directional strokes altogether and stick with either a variety of smooth shadings or tightly circular ones.
#6 Don’t Forget the Head
Throughout the process of drawing hair, don’t ever forget that there’s a cranium beneath it. This is what provides the hair’s essential shape, so pay attention to the shape of the head and how the hair naturally falls around it.
If you can remember this and remain focused on the entire body of hair instead of getting caught up in each separate strand, you’ll draw beautiful heads of hair no matter who your subject is.
More Resources on Drawing Faces and People
Drawing the Curve of Cheeks, Chins and Noses Drawing Hair
Beginner’s Guide to Drawing Faces Avoid These 5 Mistakes When Drawing Portraits
Contributions from Jerry McClish and Lee Hammond


Have a technical question?
Contact UsJoin the Conversation!